Dollhouse Blogs

Sunday 22 December 2013

Happiness and joy to all!!

Hello everyone,

Happy holidays! I just wanted to take a moment and wish you all a wonderful holiday season. I don't care what you celebrate, who you celebrate or if you celebrate , I just care that you enjoy every minute of every day.

 
Every Christmas I put up an updated picture of the dining room because it really represents what the holidays mean to me: my family sitting around the dinner table, eating, laughing, my mom yelling at my sibling and me to stop misbehaving, opening presents, watching Garfield's Christmas special...just one happy moment after another.

I wish you all the happiness in the world my dear friends and more joy then you think you can handle! I have always believed life is about living through terrible lows, and celebrating mind numbing highs. Thank you for being there through the sadness and the euphoria!

The past week has been busy, but once again I will catch up with your blogs over the holidays. I have not worked much on my miniatures, but the kitchen chairs are done

 
and while I LOVED the jade green marble dining table top I made, it looked wrong in the dining room. As you could see in the first picture, I started it over and made a green marble that compliments the room rather then overpower it


Last week I started experimenting on another project for the manor, but you will have to wait until 2014 to see it.
I send you all the biggest hug I can manage and as always I wish you all the best.
Love to all and happy holidays,

Giac

Friday 6 December 2013

Back to work on miniatures, my mom and real life kitchen renovations!

Hello my dear friends!

I hope you are all doing well. It is so nice to finally post again. Renovations are almost over and I was finally able to get beck to work on my miniatures last Sunday

and the changes continue

But before I go into miniatures, I have to thank you all from the bottom of my heart because all the prayers and thoughts you sent for my mother worked. She was operated last week and it was not cancer. Aside from a little pain she is recovering well and fast. We went to see her Wednesday night and I told her "mom, you are walking slowly, cannot go down stairs, using a walker, and wearing a shall over your shoulders to keep warm...you are turning into an old lady before my eyes!" Her vulgar answer was "Giac, go f*** yourself" Yes, she is back to her old self and will be just fine.

Now back to miniatures. A warning to all my friends: if you are kept away from your miniature project you will eventually break down and go shopping.
Last post you saw the Alhambra Piano I ordered for the Dining room. My next purchase was a commission from my good friend Julie Dewar who made the Imperial Cherry Blossom Dinner set for my Chinese tea room. I sent her a picture of a black jar with daisies on it and asked her to interpret the pattern in miniature. Once again, her artwork blows me away

Delicate daisy dresser set for the countess

 Julie, thank you so much! I cannot tell you how much I love the set. It is really a work of art and I will cherish it always. You can see more of Julie's incredible work at http://westwindsminiatures.com

My next big purchase was inspired by our trip in October. The cruise was wonderful, but I must say my favorite day was in Newport. We spent the day with my "big brother" and his wonderful partner. We had so much fun and of course the mansions were superb. I will put pictures of the trip in a pinterest page one day soon, but we could not take pictures in the mansions.

I got a lot of ideas, but the main one was how to rearrange the dressing room. It was the one room I did not really like. I think the space was just too big for a dressing room and did not work. When I saw the Newport mansions the answer came to me...separate adjoining bedrooms for the earl and countess.
Before as a dressing room

after as the countess's bedroom

I had the Bespaq "Madam's Suite" vanity, cheval mirror and chaise...

...and I purchased the bed, night table, bed steps and armoire
I got rid of the 2 older model wardrobes, removed the pier mirror, and reworked the office area. I think the room works much better and now I love it. I have a red pattern fabric and some rococo appliques for the window treatments and I am still looking for the bedding fabrics.

I also purchased my first plastic furniture kits.

some of the pieces were a bit twisted, but I think proper placement around the table can camouflage that
 
 I ordered 6 chairs for the kitchen. I will use the same technique to faux walnut them that I used on the scullery and butler's pantry. If they do not turn out right they only cost me $2,60 each. They are pretty accurate and well scaled so I think they may just do. Another project I was able to tackle Tuesday night was stone tops on tables.

I saw a lot of stone top tables in a book of mine and I just love the look

The big table is the Dining table. When I bought it the top finish was damaged as you can see in the next picture...


I was going to just cover it with a tablecloth, but I decided to try and faux marble it. I sanded the top smooth, covered the sides I did not want to paint with painters tape, painted the surface blag and then sponged on 2 shade of green. I then used the lighter green to make the veins

Green marble is one of my favorite stones

I am really happy with the effect. The second table is a coffee table for the Great room. It arrived in the mail in pieces (Bespaq glue tends to come undone in the mail) so I took the top and tried to make a faux malachite finish. I used a white base coat, covered it with a jade green and went over it many times with an old dry brush

Malachite is another favorite

Malachite is a natural stone that can come in gorgeous crazy patterns, but I based mine on a linear tabletop I saw online. I am happy with the experiment and plan on redoing the tops of the Library desk and coffee table as well as the entrance table.

Thursday night I decided to take on a small project...Will I never learn...when your house is as big as the Manor there is no such thing as a small project! For a long time I have been trying to find the right artwork for the Manor. After months of looking I was enjoying one of my favourite books


It is about Chatsworth, one of my favorite building in the world. As I was going over the pages I realized there were tons of family portraits and other paintings that I could cut and use. I went onto Amazon and purchased a used copy of the book for $8,00. I have mentioned before I always buy a second used copy of a book to cut up for miniatures...but even then it hurts me to cut books. Dewell Manor is big, so that meant a lot of artwork


I went over all of these with glossy modpodge and an old brush, a trick I learned from Ray Whitledge and I think John used it as well for Merriman Park. If you kind of follow the lines and shapes  it really makes them look like real paintings...it took me over 2 1/2 hours to go ever them and I am not sure if I have enough...now I have to paint and build the picture frames.

And that is it for now...not much miniature work, but It has only been 6 days since I got back into it. Prior to that all my time, and workspace, was dedicated to the kitchen renovation. Aside from a black frame around the window over the sink, my real life kitchen is done:

we have to finish caulking behind the stove which is why we left a towel under it...I do not want to scratch the floor


It was hard work, took up all my time and an extra source of stress, but in the end Jo and I are really happy with the outcome. Now I can concentrate on putting up the old cabinets in my workroom, and most importantly...get ready for Christmas. This weekend I hope to decorate the house, but we still have many projects to finish.

And that is all my friends. Thank you once again for your patience and your great kindness. Your good wishes really helped me through a difficult time and I appreciate all your support more then I can put into words. My blog friends are the best! I also want to welcome the new followers who have joined my adventures. It is important to me to follow you so please let me know if I overlooked anyone.

Have a great week everyone and I will be in touch before Christmas.

Huge hugs,

Giac

Thursday 10 October 2013

Just a quick update... unfortunately not about miniatures yet...

Hello My dear friends,

I hope you are all doing well and happy. You have been waiting a while for Dewell Manor updates...and you will have to wait a bit more. Because of the renovations I have not been able to work on my miniatures for weeks. I am suffering serious mini withdrawal! I have been saving up for chandeliers, but last week the withdrawal was so bad I broke down and purchased a piano for the Dining Room.
The Alhambra piano and stool. I have wanted this piece for over a long time


My real life kitchen renovations are almost over so I will be able to work on minis again soon. I hope to post at the end of the month or by the beginning of November. I am happy with the way the kitchen is coming along, but I hate renovations with a passion!
The most difficult was not having a sink and stove...very difficult for someone who loves to cook


Thank you all for your caring comments about my mother. She is doing well but her operation was pushed back to November. She is not suffering thanks to the morphine, but the thought that what she has might be cancerous is constantly on our mind. We were having supper at her home a few weeks back and I had the most wonderful tea party for 2 ever
She has more intelligent conversation then many adults I know


 I have kept up with your incredible posts but I would like to apologize to some of you. About three weeks ago I did not post any comments for a week. I read your posts but I had a strong allergic reaction to something (syrup or medicated throat lozenges I think). My hands were swollen and I was covered in hives, and the medication I was taking made me incredibly sleepy.  I could just not bring myself to comment. 18 days later I am still having the reaction, but it is very mild and under control. One who has been feeling much better the past 2 weeks is Ozzy. He looked pitiful during the renovations but now that most of it is finished he is back to his old self
This is an older picture but he has not changed


And that is my update! Sorry that there is no miniature work to show...it is driving me nuts! Next week I will not be leaving comments on any of your blogs. This was a big year for Jo and I. The last week of August we celebrated 8 years together, and the first week of September we celebrate our 5 year wedding anniversary. We do not give each other anniversary presents, but this year, being 5 years, we decided to take a little Maritime and New England cruise that will take us from Halifax to Newport...yes, I get to see the Vanderbilt Mansions!!!
The Breakers


So my friends, I will be back commenting and making miniatures as soon as we get back from our trip. Thank god I had your blogs to follow...can you die if you are away from miniatures too long???

I wish you all the best and send you all a giant Giac-size hug

Giac

Sunday 18 August 2013

Coming Soon...The Grand Staircase Hell Ceiling

Hello my dear friends,

I hope you are all doing well and happy. This is yet another faux post. I am working on the painted ceiling over the grand Staircase and decision making has been a long process. I will talk about it all in more detail when I post the finished work, but in the meantime here is a quick update.

I finally decided on the shape and size of the opening and cut it out with a Dremel.


The opening was dictated by the walls of the attic above. The design I chose is a vision of Hell from Antonio Verrio. It is inspired by the Hell Staircase at Burghley House. Here is a picture of a printout of the ceiling and my test piece
 
 
The test piece took about 20 minutes of work. It is a very fast trial piece with little detail. The reason for the trial piece is because I want to use a new technique. Have you ever missed a glop of paint or gesso that hardened? I decided to try and build up the figures with  Gesso before I painted them. Here is a close-up
 

The gesso is thick and does not run so I was able to outline the figures. Again, this is a quick test but I think it will work. The ceiling is a LOT of work and will not be very visible...but I know it will be there and I hope the chandelier will cast interesting shadows on the ''sculpted'' gesso figures.  And just as I was working on this, a discovery: You might remember how much I hate, loath, despise and abominate spray adhesive, well here is another reason why


After 2 years the spray adhesive gave way in spots and big bubbles appeared in my kitchen floor and now I am waiting for the replacement paper to arrive to start it over! Spray adhesives everywhere, beware my wrath!
 
In the meantime, here is a link to a Pinterest page I created with pictures of all the almost finished rooms of Dewell Manor. It gives you an idea of the entire house the way I see it.
 
 
And that is my update. Sadly It might be a longish time before the next post because my mom should be operated any day now and we are in the middle of renovating our kitchen! The past few weeks have been spent shopping for sinks and faucets and countertops and this past weekend was spend disassembling our current 30 year old cabinets. Poor Ozzy is freaking out a little.


Is it just me or does the red linoleum we found under the cabinets look better then the pale one they put over it?
The cabinets we removed are being put in our workroom in the basement...

Some of the cabinets are being test fitted on the right side
...which means my work area is full of cabinet pieces and stuff we need to place back eventually


And this is my new temporary mini-work area


And that is all for this time my friends. Thank you for following the insanity I get myself into and I apologize for the ridiculous delays between posts...How dare real life get in the way of minis...the nerve!!! Well, back to disassembling...

I send you all the best and a huge hug,

Giac

Wednesday 10 July 2013

A Tale of Two Libraries...

Hello everyone.
I hope you are all doing well and that life is treating you kindly. Before I go on, I just want to thank all of you for taking the time to comment on my work and a big welcome to all my new followers. I never would of thought so many people would follow my adventures.

This week, I finished the two libraries of the Manor
The Mahogany Library
 
The Walnut Library
 
Mahogany Library
 
First let me start with the Mahogany Library. Here is a picture of what it used to look like


 You may remember the carpet, a piece of red velvet I glued down with spray adhesive, came undone. This was not a bad thing because while I loved the red the carpet was boring and not what I really wanted. The other thing that bothered me, just like in the Ballroom, is that the paper, which I love, was so busy things got lost in the room. I decided to add some panelling to help balance the room...but first, the floor

The first step was to make a template using thin cardboard to cut a sub floor in illustration board. This was difficult because the bookcases were permanently attached and could not come off
Once the sub floor was ready, I started by gluing down the Greek key and borders that I wanted to stain black
I stained it by mixing about 3/4 black oil paint to 1/4 liquin, brushed it on, and then let it dry for a week and a half. The next step was to figure out the pattern inside the borders. I decided on a diamond pattern so got to cutting them
I am often asked about the iron on wood. I believe it is used to line real life furniture and counters. It comes in rolls of different sizes and has an adhesive back that is activated when heated with an iron. I used the red thing to cut off the sections of the blade of my utility knife as an angle guide, and a 1/2  inch lumber strip for the size of the piece. You can see the diamond under the small metal square before I cut it. Next I had a test run for the pattern I was thinking about
On the left is my original idea. I would glue down the diamonds, stain them red, then add a small wood strip between it all.. like a lattice design. however I hated the way the red stained squares looked. too much stain and it looked like plastic, and if you put less the yellow of the maple wood showed through and the effect was bad. I was going to use different shade woods and not stain when I accidentally brushed all the tiles together and that is when I saw the star pattern. I liked the idea so I put more down, and before you knew it I was seeing 3d cubes. I loved it, cut many more hundreds of diamonds, and glued them down.
It went pretty fast compared to other floors. I then went over it all with an iron, weighed it down for 48 hours, then added 3 coats of shellac and waxed it
The floor went smoothly and took about 45 hours to make, which was about 2/3 the time the ballroom floor took. The only problem I encountered was about 20 diamonds came loose after I applied the shellac. I glued them back down with wood glue, but the edges absorbed a bit too much shellac
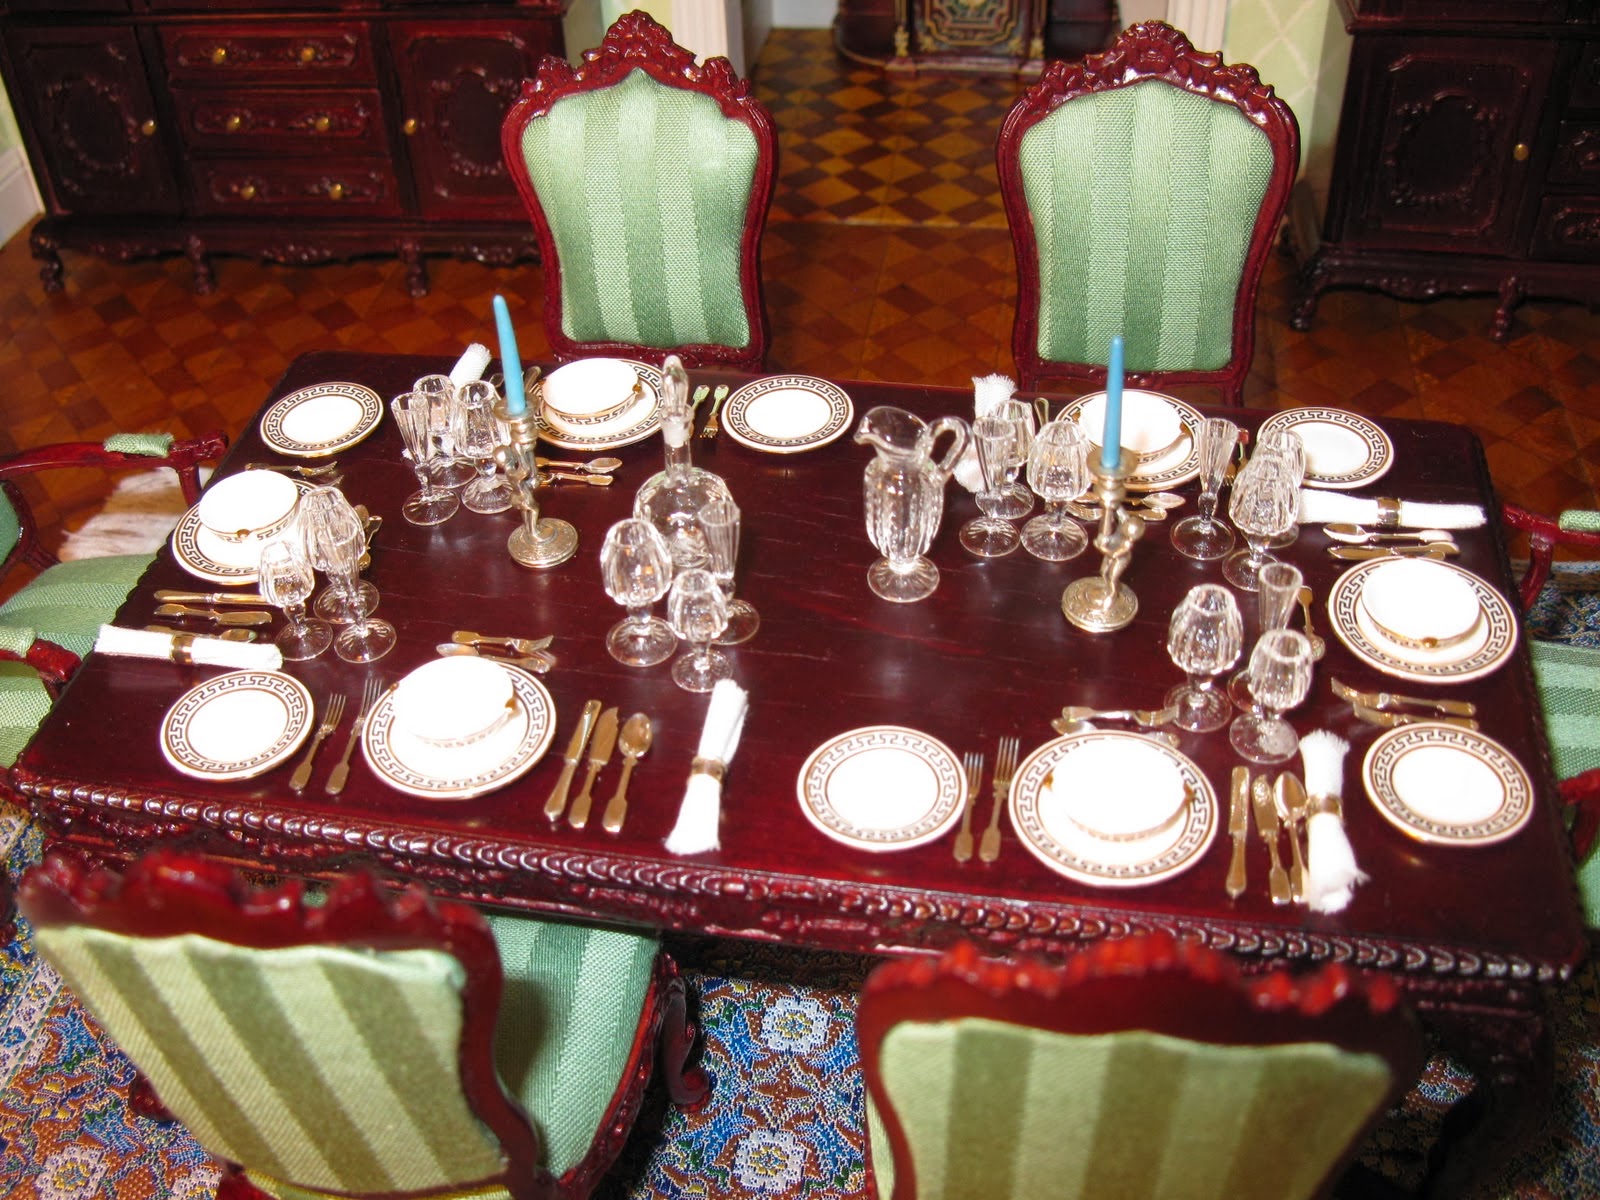
It does not look too bad and I put a table and a plant over it...it looks like a little water damage.

The next step was the wall panels. For some reason I did not take pictures, but they are just faux finished illustration board with baseboard and chair rail added. Then it was time for my mini nemesis...curtains.

After I came up with a design I cut out the top part in double thick illustration board and covered it with fabric
I glued the fabric to the back of the illustration board. Next I took out my Pretty Pleater and pleated the fabric. When it was set I glued on a piece of illustration board so the drapes would keep their shape
Finally I added a little gold braid around the top pieces (same as in the Ballroom) and then I cut out cardboard rectangles and covered them with a yellow/ gold cotton fabric to look like roll down shades. I also added a little braid to them
When all was dry I glued on the wall panels, then the drapes and that was done...I almost killed myself reaching in to attach the drapes in the desk nook, but one must suffer for art.


The gold border in the panelling was an after-thought. Originally this was to be the family library, but now it has become the room where gentlemen would gather during parties. I decided Lord and Lady Dewell  are now the Earl and Countess of Truro. Honestly, I decided this because the Ballroom felt a little grand for an every day family, and countess is one of my favourite words in the English language.
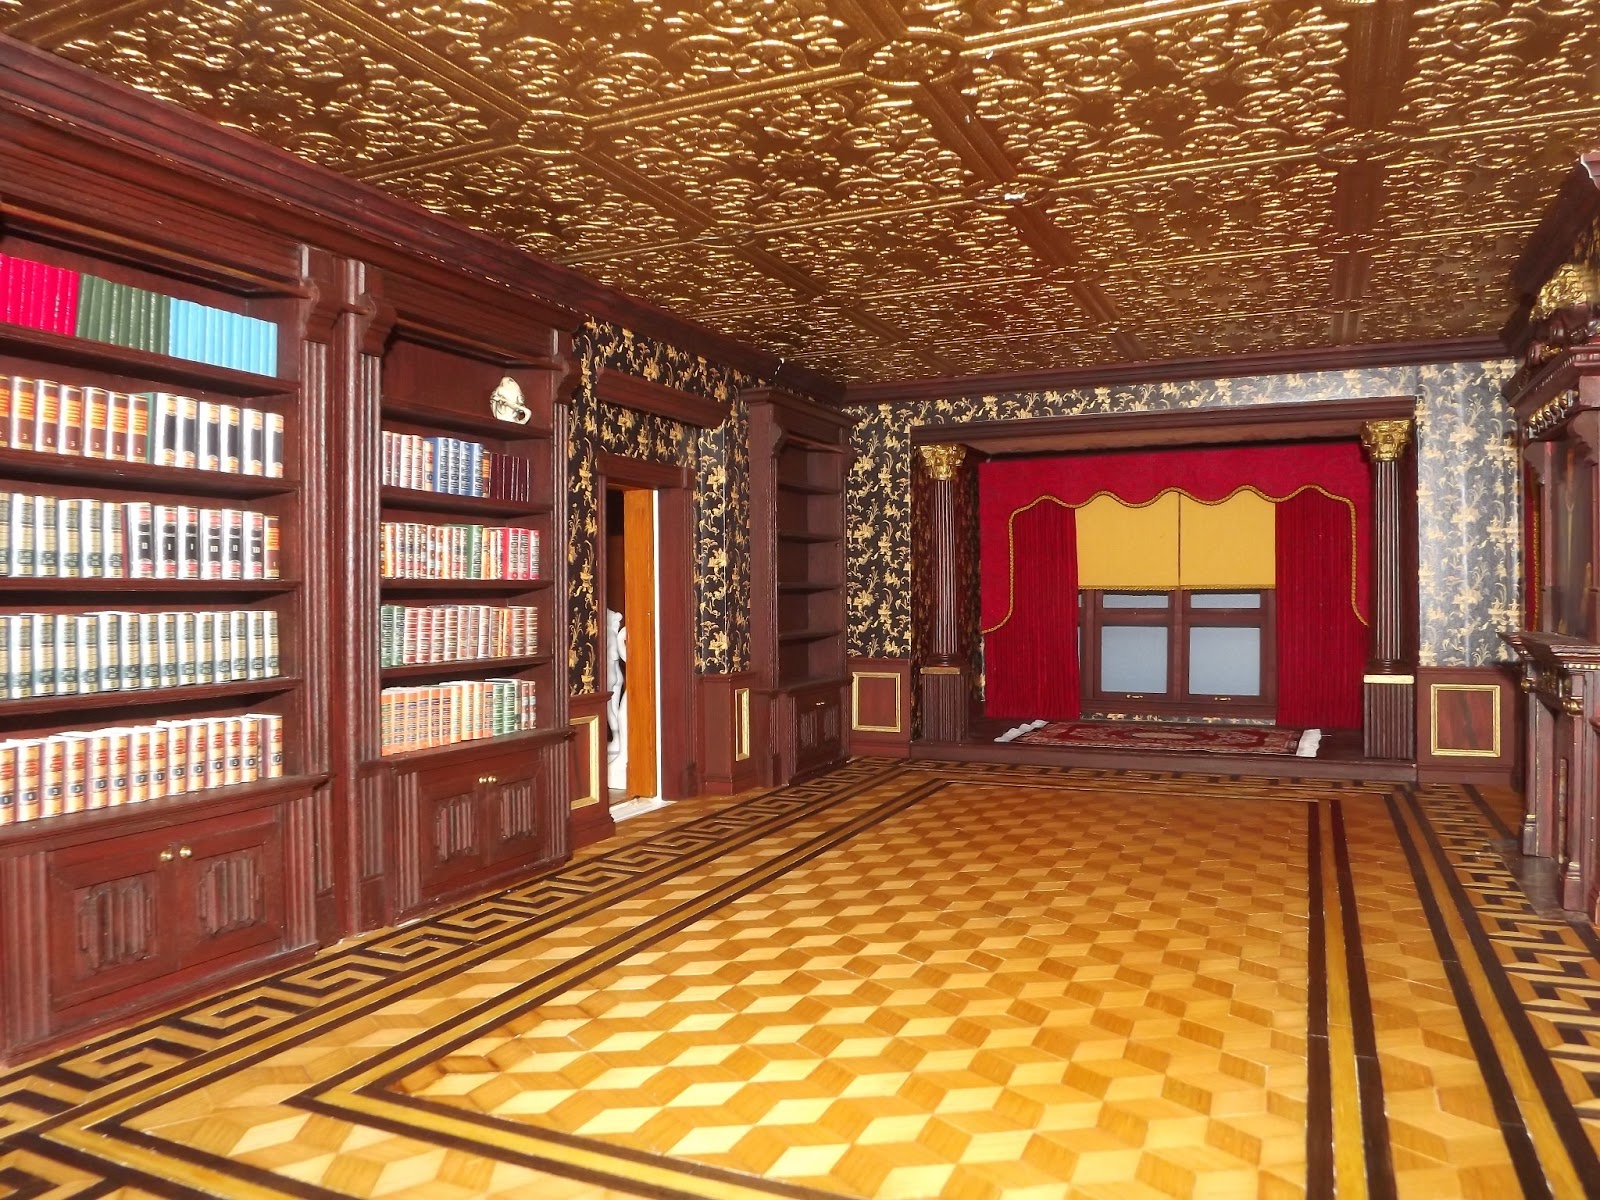
And here are pictures of the finished Mahogany Library with the 2 gold Metropolitan chandeliers from the Getzans. These are my favourite fixtures and I will order the same ones in bronze for the Great Room


Walnut Library

While I was working on the Mahogany Library, I also worked on the Walnut Library. This was originally the Bedroom hall. It was such a big space I felt it a waste not to use it better. Since the Mahogany library became a show off room, I decided a second library outside the bedroom doors would work. The children could have their lessons here, and Lady Dewell could read to them in the evening. Here is the original room

The first thing I did was figure out how big the bookcases could be. The main problem was accessing the room
there is an opening for the attic staircase on the top of the structure and 3bedroom doors. In the picture above you can see my arm through the door. I had to make sure the bookshelves would fit in those door openings.  When I had figured out all the measurements I cut the backs of the bookcases and the fireplace chimney in illustration board. I glued 1 inch wood strips for the sides of the bookcases and had a test run to figure out how to design the bookcases
This is the test run. I placed them the exact way and distance they would fit in the room...you can see it was a big space to waist. Here is how I made the bookcases

Here you see the bottom part of the bookshelf wich has faux doors. I just glued on the shelves and added a few leftover bits for extra support for the bottom section
I decided to go with a Gothic arch design. I cut out the arch shapes, then I used quarter bead molding which I scored about 3/4 of the way down every 1/8 of an inch. this is how I was able to bend the molding. In the picture above you see pieces with the molding covered in gesso to fill in gaps, and on the left the base colour painted pieces. At this point I faux painted the bookshelf structures, the arched tops, and all the lumber and molding I would need. Then it was just a question of gluing on molding. They are easy to make.
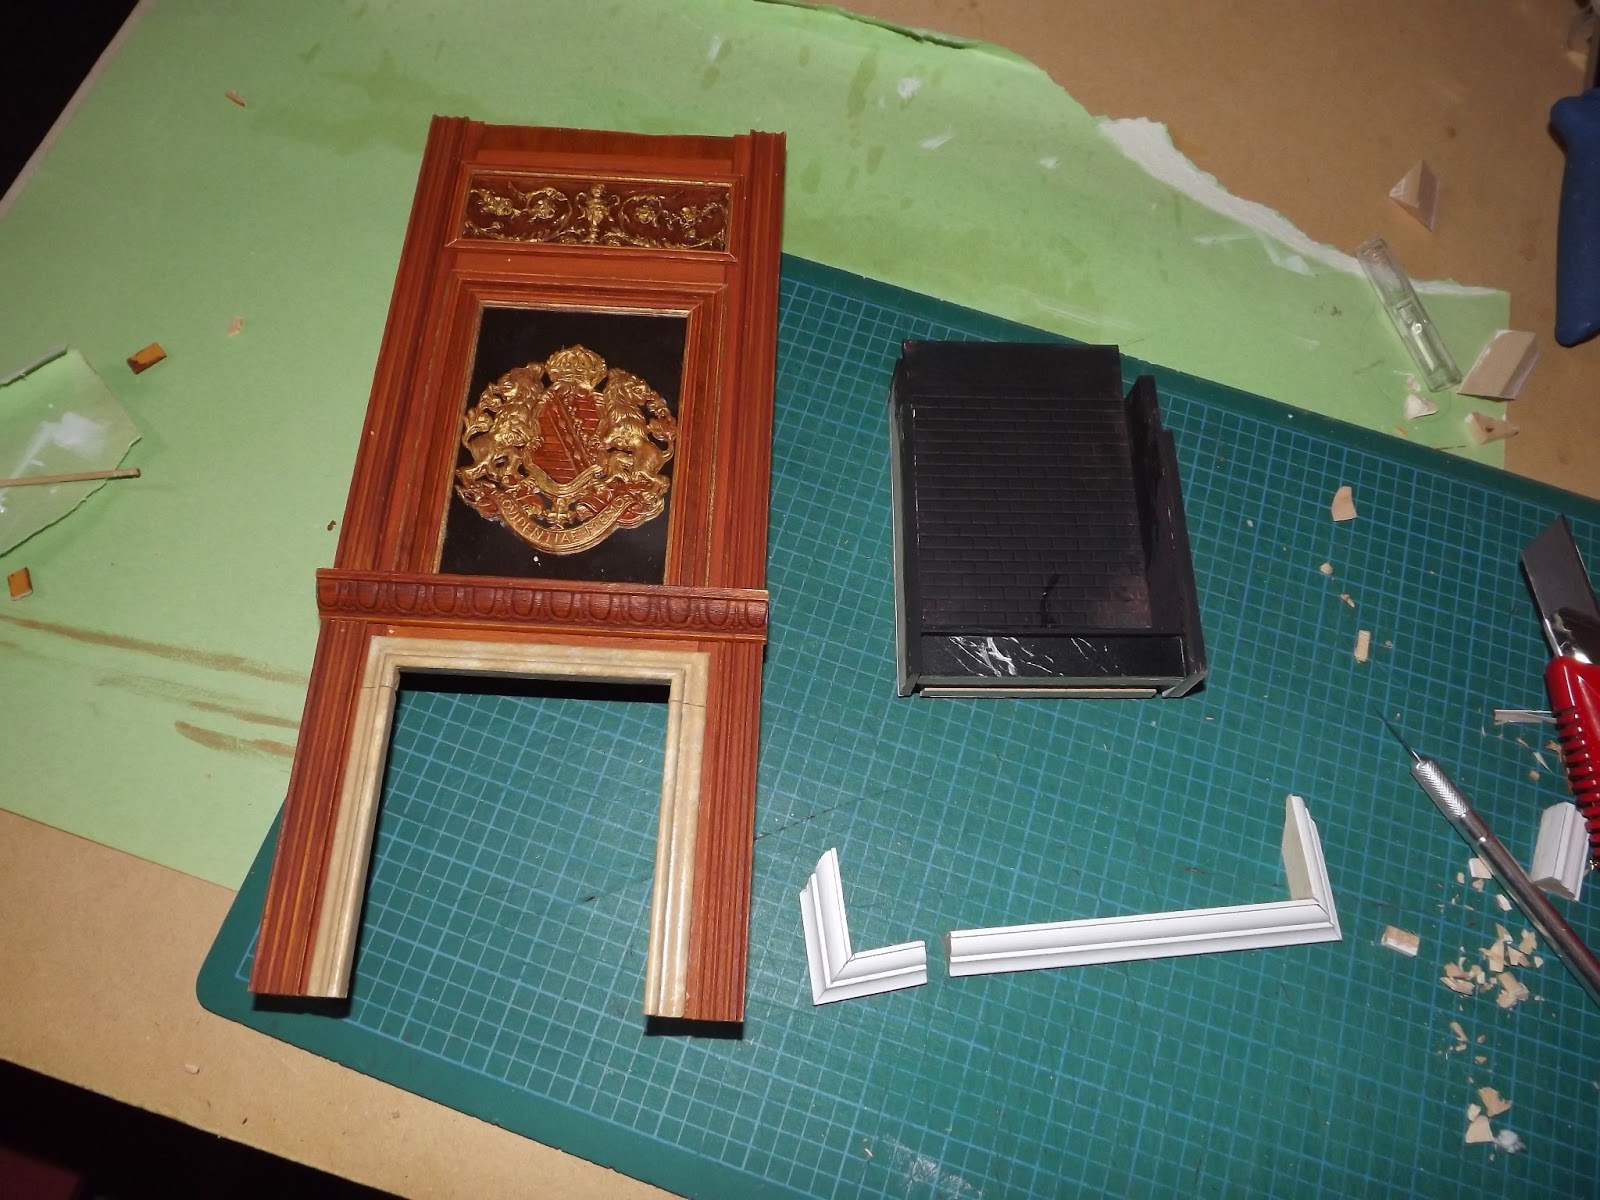
I also worked on the fireplace. Again I used basswood trim molding. I added a mirror to reflect the bookcase that would be facing the fireplace. I added a family crest over the mirror. At first I painted it to look like walnut, but then I added the gold...they are a noble family after all
The firebox is just cardboard and some plastic 1/4 inch brick sheet I had left over. I also assembled the crown molding because I knew it was going to be hell to assemble from those small opening...not to mention it had to fit around the existing crown molding on the room
Finally I added ogee molding, fake doors, jewelry bit key holes, and some thin lumber strips on the sided of the bookcases just for detail

Now I do not have any good picture of this room because you can only see it through the doors. The bookcases are not glued in. I want to first fill them with books, permanently glued down, before I glue them into place. So here are all the views:


View from the Young Master's Bedroom door

View from the Young Lady's Bedroom door

View from the My Lady's Dressing Room

And a view from the Gallery, which can only be seen with a camera...but I love this shot

I agree, you cannot see this room well, but it really adds to the realism of the house, and besides, I've done crazier things...

And there you have it my friends, the opulent Mahogany Library and the family Walnut Library. Mu next project is the painted fresco dome over the Grand Staircase and last Sunday I placed a large order for lumber for...yes, finally, the front windows and doors. I should be working on the exterior of the Manor by August.

Thank you all once again. I hope you enjoyed this post as much as I enjoy and learn from all your wonderful blogs. Now I am off to bed as tomorrow is a very special day... tomorrow Ozzy turns 8.

 
 I send you all a great big hug and much love,
Giac