Dollhouse Blogs

Thursday 29 December 2011

Christmas 2011, I love Getzan Chandeliers

Hello everyone!
I hope you all had a wonderfull Christmas. As always I received both side on the 24th. I cooked/ ate all day and we had a wonderful time. This year was even better because we finally had a baby in the house. My sister Marilena had Alina in April. She's the most vivacious medium girl you've ever seen...I say medium because I refuse to refer to a 23 pound 8 month old as little!

 Once again, I was spoiled rotten this year. As always Jo and both sides of our family got together to get my presents. I am so happy to say, I have the first chandeliers for Dewell Manor!

The 3 chandeliers are called "Charleston" from http://www.jgetzan.com/, as well as the pans. The 2 antique Bronze finish fixtures and sconces are for the Great Room, and the gold one with the extra long chain will hang over the staircase. All the chandeliers I have chosen for Dewell Manor are from the Getzans. What I love about their chandeliers is the detail and workmanship. The fixtures have a beautiful architectural quality to them that is exactly what I envisionned for an english Manor house. I love cascades of crystals as much, if not more, then anyone out there, but they would of looked out of place in many of the rooms of my project.

To the left of the pans is a Ballerina figure from Randall Zadar. The detail in his pieces is amazing! 

And Jo remembered these pieces I wanted and found them online. The cabinet is for the Gallery, and the chairs will go in the Dressing Room. He got BIG husband point this year...BIG!!!

Now that it's over I've been working on the Music Room, I hope to have it finished before I go back to work on Tuesday and will post the minute it's done.

Happy new year to everyone!

Giac!

Saturday 24 December 2011

Merry Christmas

Merry christmas and happy holidays to all!

Thank you for your wonderful support and very great kindness. Creating this blog was a way to keep me focused and going forward. I never expected to meet such great people or make so many friends.

To all of you, whether you're celebrating Christmas or not, I wish you only the best and all your hearts desires.

I wish you happiness and peace in the home

I wish you prosperity and a dinner table surrounded by loved ones
And in the spirit of Garfiled's Christmas Special, I wish you lots and lots of presents

When I came down and saw an object in the house I paniced and thought "what broke", Then I saw it was santa...Jo just scored lots of husband points!

It's been a crazy couple of weeks, and now I look forward to a week off catching up on all your blogs.

I always say it, but it is sincere,
All the best my friends,
Great big Hugs
Giac


Sunday 18 December 2011

Girl's Bedroom and central attic partitions

Hello all,
I hope you are all doing well and not going too crazy in preperation for the holidays!
I finished the Girl's Bedroom today.


The biggest challenge was the door. It took me a while to commit to a design. I decided on a classic pannel on the bottom half and linen fold detail for the top. The field aroung the linen fold looked a bit empty, so I took a basewood corbel, sliced it, and glued it into the inner corners of the frame. All the other bedroom doors will be the same, only finished in faux-walnut.


  Instead of hanging picture frames in this room, I'm thinking of making a half round canopy with curtains to go over the headboard. Most likely it will be blue and white silk with gold trim.

 I also put up some partitions in the central part of the attic for the Nursery and Bathroom.

The Nursery will be 21" x 15"

To the left of the fireplace there will be a built in bench with curtains. Over the fireplace I cut out an opening that is over an inch deep for a 1:144 roombox. I'm not sure, but I'm thinking of a scene from Alice's Adventures in Wonderland. On the back wall, where the crib is, I'm going to make a puppet theater, and I want to make a child height table with dolls, puppets and several different teapots...yes, Alice's Adventures in wonderland and Through the Looking Glass are amongst my favorite stories.
The bathroom will measure 13 x 13. I have white and pale green victorian tile sheets for the walls, and Mahogany bathroom furniture (sink, Toilet, bathtub and cabinet) from bespaq. I'm not sure what will go where just yet.

Finally, I've mentionned before that I am not a fan of spray adhesive. and here is why:

The parquet section of the Great Room floor came right up. It was an easy fix, I just re-glued everything with The ultimate Glue and stacked books on top overnight, but I can officially say I've gone from not liking spray adhesive to hating, loathing, and abominating the stuff.

And now I'm off to make supper. I hope everyone has a wonderful week and good luck with last minute shopping and holiday preperation.

All the best,
Giac

Saturday 3 December 2011

Library

Hello all!
I hope everyone is having a great weekend. After a long, hard week at work, I finally was able to finish the library.

Last post I had just finished the bookcases. When they were dry, I realized right away that the color would not work. I think I used too much liquin in my oil paint top coat. The finish was mat and boring and way too light. I mixed up new batches of black and Burnt Umber paint and re-did them. The flash on the camera makes the color look more brown then it is. The second time around I was happy!

Sorry, again I can't get it right side up.
I also painted the baseboards, doorframe and mantel pieces.
The next step was making the windows. I already posted about window making, so I won't go into the details again. Basically they are all made from basewood to look like double hung windows and faux painted.
The Mahogany faux paint technique I use is to apply a coat of delta ceramcoat Red Oxide paint. When dry, I go over with Black and Burnt Umber oil paints thinned with Medium. When dry, I added window handles and locks on the bottom sash.

 Next, I had to glue down the carpet. I had glued my piece of red velvet onto an illustration board subfloor with spray adhesive. When I took it out to attach it to the structure, the velvet came loose. Why I used spray adhesive I just don't know. I HATE the stuff because it never works for me the way it should. After 5 minutes of swearing, cursing and pacing the room. I calmed down and tried to attach the velvet back with double sided carpet tape...I ran out just before I was finished. I took out my glue stick because it is not liquid and would not go through the velvet...Folks, it went through the velvet! In the end, it looked like a well worn carpet and the area the glue came through was going to be hidden by a Turkish Rug, so I glued it down to the structure.
About 25 minutes later, I was pouring myself a cup of coffee when I froze solid...I haden't put the electrical wires in the channels under the carpet before I glued it down.
I ran down and ripped the carpet out. ..half of the cardboard stayed stuck to the floor. Thankfully the glue hadn't set so I was able to rub it off.
I put the wires in, bought more illustration board and double sided tape...thank God I had another piece of velvet just big enough for the floor...steamed the wrinkles out, and started all over. The double sided tape worked well to attach the velvet to the subfloor. I then glued it to the structure with the Ultimate Glue. This experience is why there will be no more wall to wall carpet in Dewell Manor.


I had painted the fireplace, overmantel and columns for the nook months ago. The color was great, but the details didn't stick out. I found some gold colored oil based paint with a bit of a metallic sheen and just went over some of the details so they would stand out. The painting over the fireplace is a postcard I got in Europe 
Finally, everything got done. In a past post I had mentionned I wasent sure about the red carpet. Some friends pointed out it might be too bright. However, I changed my mind when I put the painted bookcases in the room. I think the room needed an intense, bright floor color because the walls, ceiling and woodwork and furniture were so dark.
I will now work on the 3 ladders for the bookcases.


That's my update for this week. Welcome to all my new followers and once again, thank you all for your interest and for taking time to comment. I appreciate it very much.
I hope everyone has a wonderful week,
All the best,
Giac

Sunday 20 November 2011

Gallery update and Library bookcases

Hello all,
I hope everyone is well.  I had 3 vacation days this past week and planned on working on Dewell Manor the whole time. However, reality was spending time at my mom's and helped her around the house,  visiting my niece, and we had a family supper for my grandmother's birthday. Not what I planned, but it was fun!
I did spend 2 whole days working on the Gallery and the Library bookcases

Gallery


Originally, this space was going to be the bathroom and you'd only see the staircase balustrade through a door. I'm glad I listened to Jo and didn't close off the landing. I decided to make this an art gallery because I have a few sculptures I purchased on our vacations, and I have a soft spot for Randall Zadar figurines.
Note to all, when I assembled the floor I put 1 square with the grain in the wrong direction. I couldn't tell untill the floors were shellacked. That's the single yellow square that jumps out at you. My solution, I'm covering it with a large pillow for one of the dogs.

My second project were the bookcases for the library
They are 10 1/2 inches high, so I incorporated a brass rail at the top for rolling ladders.
Above,in order:
 I started by gluing bassewood strips to an illustration board back
I built up the bottom section for the doors
then, I added the front strips which match the door and window frames


I wanted the bookcases to look built in, however I made the false wall in the library 1/2" deep , but the bookshelves  are 1" deep. So I attached a 1/2 in spacer to the back of the front strips.
on the right, I added moulding and corner blocks

I added crown moulding, quarter bead moulding and doors. I decided the doors didn't need to open.

To hold the brass rod for the ladder, I drilled holes into corbels and glued them on.
The final touch was linen fold panels to add a little interest to the doors.

 Sorry, can't get the picture right side up!


This week, I'm going to try to finish the library...hopefully I'll be able to post next weekend.

I say it every time, thank you all so much for your interest and your feedback. I'm off to catch up on all your projects.
I send you all my best and I hope you have a wonderful week,
And a Very Happy Thanksgiving to all who are celebrating.
Giac

Sunday 6 November 2011

Gallery floor, a little bit of house and family history.

Hello all.
I hope everyone is well. I haven't had much time to work on the Manor in the past 2 weeks. Last weekend we spent both days outdoors getting the yard ready for winter, and yesterday I spent all day decorating the house for the holidays. Yes, some think it's a bit early, but Christmas makes me happy and that's all the reason I need!

Actually, I've been working on the floor for the Gallery, the room just above the entrance at the top of the stairs. I say this all the time, but it took forever! About 18 hours in total.

I wanted the wood floor to match the pattern of the black and white marble floor of the room underneath. As with all the wood floors I used the iron on wood strip rolls you get at hardware stores. They work great, except that the rolls are so thin it's hard to get it to lie perfectly straight when you cut it, so adjustements were necessary for almost every single piece of the floor. Attaching them is easy, I just put the wood side of the piece against the iron for 6 seconds, till the glue starts to go white and bubble a little, then I attach it to the illustration board sub-floor.

I booked my last 3 vacation days on the 14,15 and 16th of the month, so next weekend I should tackle the attic floor devisions, Gallery panneling, and then either assemble the Library bookcases or carve the Caryatides for the music room.
That is all in terms of progress, but I did promise everyone a little information about the house and the family who will live there...
First of all, the design and location of the house came from 3 of my favorite movies. For the location of the house, I wanted it to be on the edge of a cliff, like Windward House from the 1944 movie The Uninvited
The location of the Cliff is somewhere in Cornwall England, inspired by Manderlay, the estate from the 1940 film Rebecca. Basically, the cliff is at the end of a vast estate with a beech at the bottom of the cliff and is surrounded by woods, orchards, Gardens and seperate buildings to house the staff.

The house itself was VERY inspired by Thornewood Castle, the House used in the Stephen King mini-series Rose Red.

Thornewood Castle
Thornewood, for me, is the most beautiful house I've ever seen. I just fell in love with it and I thought it was perfect for a doll house. www.thornewoodcastle.com  ...sooo many shingles to cut.. 
Because my Manor is in the country  and set about 1895 to 1905, I decided the house has plumbing in the kitchen and a bathroom in the attic floor. For lighting they used candles because gas pipes for lighting only reached the rural areas later on. The house had Central heating (Furnace in the basement and heat grates in the rooms) which used coal, but because the the house is in the country and it was so readily available, all the fireplaces in the house are wood burning.

As for the family, They will be a family of 5 (1 son and 2 daughters) who are not nobility, but come from prosperous families who have made their fortunes in the textile and timber trades, and also investments in shipping. I'm still working on the individual members of the family and staff. Mostly they are inspired by my favorite movie characters. I've given a lot more thought to the staff then the actual family. My biggest source of information was the book "Victorian House" by Judith Flanders.

I called the house Dewell Manor. Originally, I thought it would be fun to use my own name for the house, but Giacomo Dell'accio just sounded wrong for an english manor house. So after looking up popular victorian names, I decided to use the maiden name of one of my favorite people in the world, the mother of one of our dearest friends from Manchester UK, Yvonne Dewell. I thought Dewell Manor (pronounced duel) had a beautiful ring to it and she was kind enough to let me use it. She also helped me with the story behind the family.
Once again it's past my bedtime. I will definetley share my progress by Wednesday the 16th.
Thank you all for your encouragement and you great comments. I hope this post wasent too boring. I wish everyone a great week and send you all the best.

Giac

Sunday 23 October 2011

Great Room back doors and Update pictures.

Hello everyone. I hope you're all having a great weekend.

I spent all day yesterday packing and unpacking furniture. Some of the rooms are almost finished so I need to start looking into artwork. In other rooms, there are certain projects I have in mind but I wanted to see them with the furniture in place before I begin. Also, I made sure my inventory sheets are up to date. At this time I'm missing about 10 pieces of "vital" furniture.

Now, I love putting furniture in the house and seeing the rooms "complete". However, I have 177 pieces of furniture for the manor. It takes hours to unpack everything, dust them, fix any ungled parts put them in place...and it takes even longer to pack everything up again. But here are some pictures for your enjoyment.
Entrance and Grand Staircase


Great Room (Drawing Room side)


Great Room (Game Room side) missing arches in the windows over the doors.


Kitchen missing plate drying rack over the back sink


Dining room missing door to Loggia


 The other project I worked on was the Great Room doors to the back yard. As with the windows I decided to make all the doors of the manor from scratch. I wanted them a bit larger and taller then what is commercially available.


These will be non working. Since they are at the back of the Great Room it would be hard to get to them.
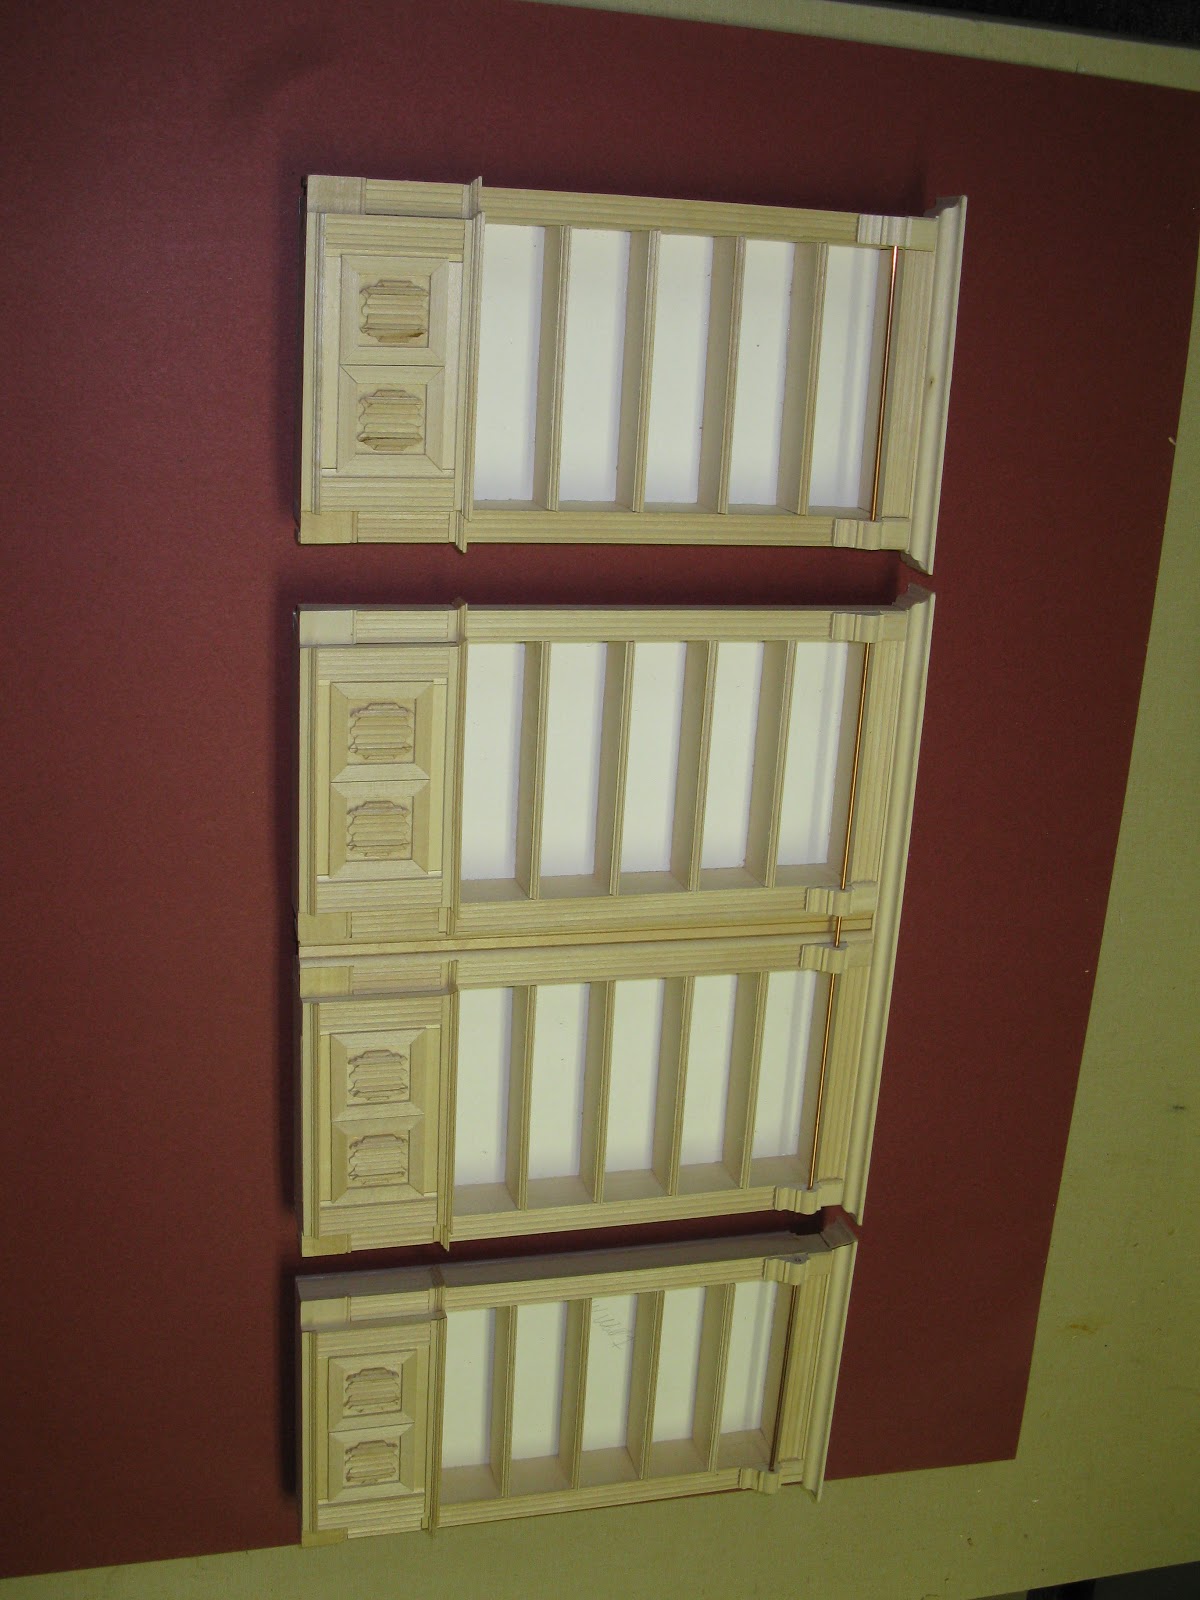
I took a 3 inch wide piece of lumber for the bottom half of the door, cut one piece to the width of both doors, and then I used 1/2 " lumber cut to 8" to make the vertical sides of each  door and glued them on with carpenters glue and gel super glue
The bottom picture shows the back of the doors. I just added smaller pieces of lumber in the center and at each end to hold the window panes and the top piece of the door in place. Then I attached molding strips inside each frame and I made more linen fold pieces for the bottom frame of the door

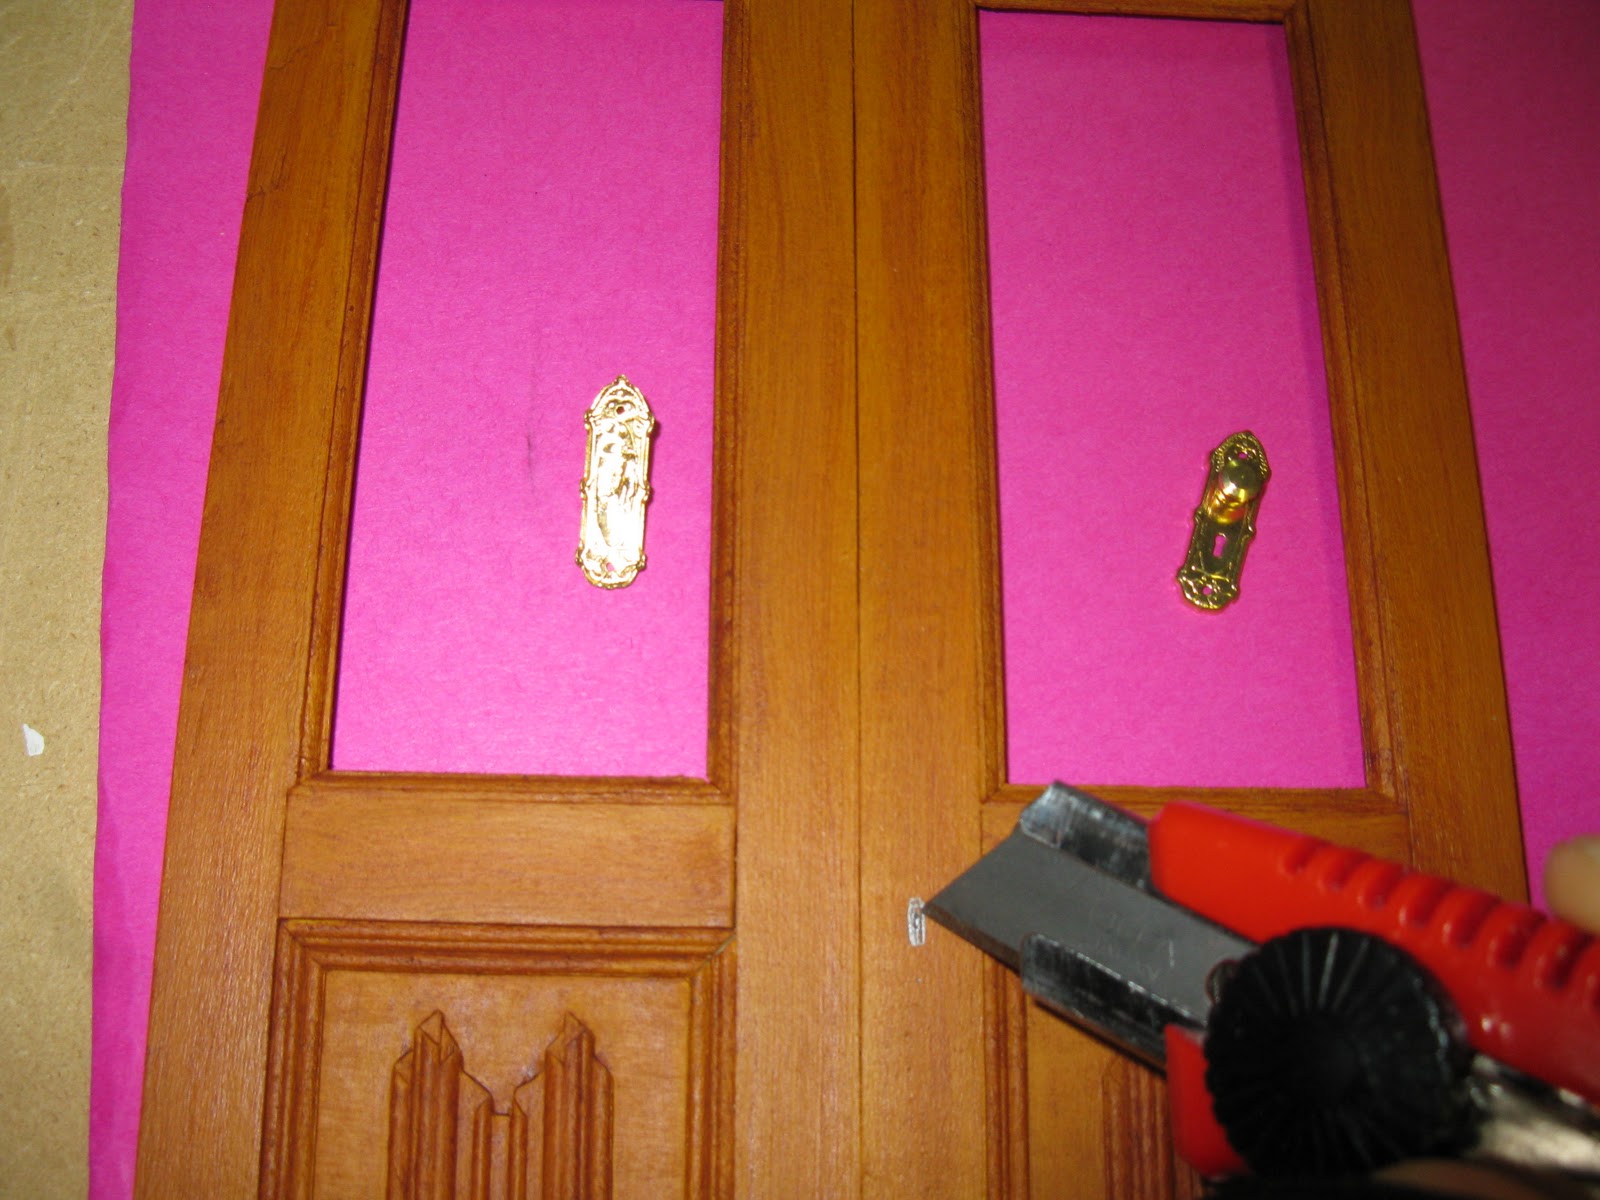
When the door was dry I painted it antique gold, then faux finished it with oil paint and liquin. Then I placed one door handle,  notched out a piece of the door where the keyhole goes and painted it black.
The doorhandles came with matching keys, so I used one to block the keyhole on the other door...I think, realistically, only one side should have a working keyhole. Finally I glued on the doorknobs with a bit of "The Ultimate" glue and gel super glue, applied with a toothpick. And Voila

You can see it in place in the pictures of the Great Room earlier in the post, Game Room side

And that dear friends was my weekend thus far. Today I'm startuing work on a parquet floor for the Gallery.

I have made a list of the remaining interior projects I have to get to:
11 Doors
29 Windows
Bedroom wood floors
Paneling in Gallery, Master Bedroom, Boy's Bedroom and Library
Library Bookcases
Kitchen Plate Drying Rack
Music Room columns and caryatides
Carved overmantels for Library and Master Bedroom
Room divisions for entire Attic  (Nursery, Bathroom, Sewing Room, Studio, Housekeeper's Bedroom)
Chandeliers, Sconces and fireplaces
Clock Tower
and of course front opening panels, which must be bricked, and the thousand of slate shingles for the roof.

And I'm sure I forgot some...My goal is to finish the interior of the house for my birthday May 2nd, and the exterior for end of summer 2012.

And now I'm going to get back to work. I will try to post mid-week about the gallery floor and I will take the time to talk about the story about the house...year, location, family...Just so you will all have an idea of my vision.

I wish you all a great week and once again, thank you for your feedback and your very kind encouragement...if I don't feel overwhelemed by what is left to do it is becaus eyou all help keep me positive and wanting to do more and better. I can't wait to see the progress of all your projects.

Best wishes, my friends,
Giac